こんにちは、梶川です。
先日公開された「Vagrantを使ってCloudStack上の環境構築をしてみよう」はご覧いただけましたか?前回の記事では、Vagrantを使ってIDCFクラウド上の仮想マシンを作る手順をご紹介していますが、記事で利用しているテンプレートは「Ubuntu Server 12.04 LTS」でのご紹介でした。
これを見てCentOSのテンプレートを使って試された方もいるかもしれませんが、CentOSの場合sudo(vagrnatはsudoを使う)のデフォルト設定が「Defaults requiretty」となっているため、ttyを持たないsshによるコマンド実行などができません。
そこで今回vagrantからの利用に適した、CentOS6.5のテンプレートを公開いたします。通常のCentOS6.5からの変更点としては、vagrantユーザーの追加、vagrantユーザーへのssh公開鍵の設定(通常通りrootへも設定されます。)、vagrantユーザーのsudo設定(!requirettyとNOPASSWD: ALL)が変わっています。
Vagrantfile
こちらのテンプレートに合わせたVagrantfileも公開していますのでご利用ください。
※ vagrant-1.4.3 + vagrant-cloudstack-0.2.0 にて確認しています。(display_name,groupの指定は0.2.0以降でないと指定できませんのでご注意ください。)
<strong>VAGRANTFILE_API_VERSION = "2"

    Vagrant.configure(VAGRANTFILE_API_VERSION) do |config|
      config.vm.provider :cloudstack do |cloudstack, override|
        override.vm.box = "dummy"
        override.vm.box_url = "https://github.com/klarna/vagrant-cloudstack/raw/master/dummy.box"

        cloudstack.instance_ready_timeout = 1800

        cloudstack.scheme = "https"
        cloudstack.host = "api.noahcloud.jp"
        cloudstack.path = "/portal/client/api"

        cloudstack.api_key = "<span style="color:red; font-weight:normal;">YOUR API KEY</span>"
        cloudstack.secret_key = "<span style="color:red; font-weight:normal;">YOUR SECRET KEY</span>"

        # Zone 1=jp-east-t1v(Tokyo), 2=jp-east-f2v(Shirakawa)
        cloudstack.zone_id = "1"
        # TemplateID 6204=[LATEST][Vagrant Box] CentOS6.5 64-bit for vagrant-cloudstack
        cloudstack.template_id = "6204"
        # ServiceOfferings XS=24,S2=30,S4=22,M4=21,M8=20,L4=31,L8=18,L16=17,L32=16,XL12=26,XL16=15,XL32=52
        cloudstack.service_offering_id = "30"
        cloudstack.keypair = "<span style="color:red; font-weight:normal;">YOUR SSH KEY</span>"

        cloudstack.pf_ip_address_id = "<span style="color:red; font-weight:normal;">IP ADDRESS ID</span>"
        cloudstack.pf_public_port = "22"
        cloudstack.pf_private_port = "22"

        cloudstack.display_name = "<span style="color:red; font-weight:normal;">DISPLAY NAME</span>"
        cloudstack.group = "<span style="color:red; font-weight:normal;">GROUP NAME</span>"

    #    override.ssh.username = "vagrant"
        override.ssh.private_key_path = "<span style="color:red; font-weight:normal;">~/.ssh/id_rsa</span>"
    #    override.ssh.port = "22"
      end
    end</strong>
赤字の部分は必ず環境に合わせて設定する必要があります。確認方法は下記を参照してください。一部前回の内容とかぶりますが、GUI上での確認する方法を載せておきます。
- cloudstack.api_key
- APIキーの確認
- cloudstack.secret_key
- API秘密鍵の確認
- cloudstack.keypair
- 仮想マシンに登録する公開鍵を指定
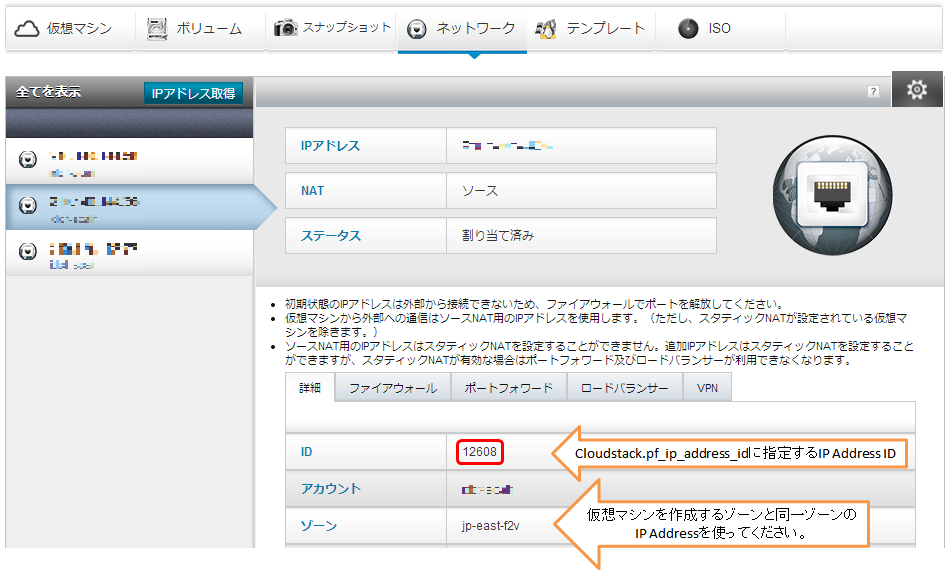
- cloudstack.pf_ip_address_id
![]()
- cloudstack.display_name
- 仮想マシン表示名の指定(不要であればコメントアウト)
- cloudstack.group
- 仮想マシングループ名の指定(不要であればコメントアウト)
- override.ssh.private_key_path
- cloudstack.keypairで指定したSSH公開鍵と対になるSSH秘密鍵を指定
その他の部分はデフォルトでも起動はできますが、必要に応じて設定してください。
- cloudstack.zone_id
- 仮想マシンを作成するゾーンを指定。コメントにありますが、1=東京, 2=白河となります。
- cloudstack.template_id
- 作成する仮想マシンに利用するテンプレートの指定になります。コメントにもありますが、今回提供のvagrant対応CentOS6.5のテンプレートのIDは6204となります。
- cloudstack.service_offering_id
- 仮想マシンタイプの指定。課金に直結する部分となります。目的のタイプを選択してください。実際の仮想マシンタイプとID番号はコメントに記載してありますが「XS=24,S2=30,S4=22,M4=21,M8=20,L4=31,L8=18,L16=17,L32=16,XL12=26,XL16=15,XL32=52」となります。
- cloudstack.pf_public_port
- cloudstack.pf_private_port
- ポートフォワーディングの設定
- override.ssh.port
- sshする際の接続先ポートを指定。cloudstack.pf_public_portでポート番号を変更している場合などは、合わせて変更してください。
これでUbuntu,CentOSどちらもvagrant-cloudstackから利用できるようになりました。vagrantを使って楽々IDCFクラウドを利用しましょう!
vagrant-cloudstackのおさらい
基本的には前回説明していますが、以下にvagrant-cloudstackを利用してIDCFクラウドで仮想マシンを起動するまでの流れを説明します。
Vagrantのインストール
まずは自分の環境にVagrantをインストールしましょう。
<strong>$ vagrant -v
    Vagrant 1.4.3

    $</strong>
vagrant-cloudstackのインストール
<strong>$ vagrant plugin install vagrant-cloudstack
    Installing the 'vagrant-cloudstack' plugin. This can take a few minutes...
    <span style="color:green; font-weight:normal;">Installed the plugin 'vagrant-cloudstack (0.2.0)'!</span>

    $ vagrant plugin list
    vagrant-cloudstack (0.2.0)

    $</strong>
作業ディレクトリとVagrantfileを準備
<strong>$ mkdir idcf-cloud
$ cd idcf-cloud
$ vi Vagrantfile <span style="color:red; font-weight:normal;"><=上記で説明したVagrnatfileを用意</span>
$ ls
Vagrantfile
$
</strong>仮想マシンの起動
<strong>$ vagrant up --provider=cloudstack <span style="color:red; font-weight:normal;"><=--provider=cloudstackを忘れずに!!</span>
Bringing machine 'default' up with 'cloudstack' provider...
<span style="color:gold; font-weight:normal;">[default] Warning! The Cloudstack provider doesn't support any of the Vagrant
high-level network configurations (`config.vm.network`). They
will be silently ignored.</span>
[default] Launching an instance with the following settings...
[default] -- Display Name: display_name
[default] -- Group: group_name
[default] -- Service offering UUID: 30
[default] -- Service offering UUID: 30
[default] -- Template UUID: 6103
[default] -- Zone UUID: 2
[default] -- Keypair: your_ssh_key_name
[default] Waiting for instance to become "ready"...
[default] Creating a port forwarding rule for this instance ...
[default] -- IP address ID: xxxxx
[default] -- IP address: xxx.xxx.xxx.xxx
[default] -- Public port: 22
[default] -- Private port: 22
[default] Waiting for SSH to become available...
[default] Machine is booted and ready for use!
[default] Rsyncing folder: /Users/N1302A005/vagrant/test/ => /vagrant
$</strong>仮想マシンへssh
<strong>$ vagrant ssh
    <span style="color:cyan; font-weight:normal;">    ________  ______   ______                 __  _
       /  _/ __ \/ ____/  / ____/________  ____  / /_(_)__  _____
       / // / / / /      / /_  / ___/ __ \/ __ \/ __/ / _ \/ ___/
     _/ // /_/ / /___   / __/ / /  / /_/ / / / / /_/ /  __/ /
    /___/_____/\____/  /_/   /_/   \____/_/ /_/\__/_/\___/_/</span>

    [vagrant@i-xxxx-xxxxx-VM ~]$
    </strong>
不要になったら削除
<strong>$ vagrant destroy
    Are you sure you want to destroy the 'default' VM? [y/N] y
    [default] Deleting the port forwarding rule ...
    [default] Terminating the instance...
    [default] Waiting for instance to be deleted
    [default] Waiting for instance to be deleted
    [default] Waiting for instance to be deleted
    [default] Waiting for instance to be deleted
    [default] Waiting for instance to be deleted
    [default] Waiting for instance to be deleted
    [default] Waiting for instance to be deleted
    [default] Waiting for instance to be deleted
    [default] Waiting for instance to be deleted
    [default] Waiting for instance to be deleted

    $</strong>
それでは、VagrantでIDCFクラウドをお楽しみください。
<連載記事>
- Vagrantを使ってCloudStack上の環境構築をしてみよう
- vagrant-cloudstack用 CentOS 6.5 テンプレート公開